Saturday, December 12, 2009

New Addition to the Family

Perish the though! No babies or other new pets around here. I'm pleased to present:

Lady MacBess


She followed me home from the guild sale. Due to her advanced age and abundance of character, Ms. MacBess was slated for the bin so I suppose I'm really he Knight in Shining Armor. ;) Now that Devi and Tara are in high school I need a model that's home every now and then. So far, it's working out just fine.


 Lady MacBess modeling the Citrus Punch scarf

This is the scarf I started for community knitting at MewMew's Yarn Shop in Lafayette, CO. Tara's shirt fits her very well. Yes, I see the Lady and I spending a lot of time together from here on out!

Friday, December 11, 2009

Joan's Woven Shibori Samples

Joan Torgow took the woven shibori workshop also and was kind enough to send pics so we can all share in the fibery goodness. ;)

sample 1- free form pickup


sample 1-  paint with unthickened dyes, gather, immersion dye

 
sample2- Taiten


sample 2- gather, then paint one side with thin dye wash in blue/green grays, the other side with thickened red/yellows
 
sample 3- Free form pickup on open shed


sample 3- remove some gathering threads to create negative space, gather, immersion dye


sample 4- Traditional Monks belt


sample 4- gather, then paint with thickened dyes: red/yellow on one side, greens on the other


sample 5- Monks belt on open shed


sample 5- paint with unthickened dyes (pale yellow?), gather, immersion dye


sample 6- Traditional Monks belt and Monks belt on open shed, filament polyester weft


sample 6- paint with thin dyes, gather, then immersion dye, steam to set permanent pleats
 
sample 7- linen weft, traditional monks belt and monks belt on open shed (no "after" pic for this one yet)


sample 8- weft is ecospun polyester in the same shed with various colors of 8/2 cotton, monks belt on open shed and taiten


sample 8- gather, immersion dye with steam to set permanent pleats, press on disburse dye (not very visible), remove gathering threads 


 Thanks, Joan!


Tuesday, December 8, 2009

Free Pattern: Toe Up Sock Ornaments

As promised, a free pattern for the socks in the last post. You can use fingering weight or sportweight for this one. Worsted weight works as well if you switch to size 3 needles. Only uses a little bit, 10-15 grams per pair, great for using up leftovers!

Update: Turns out they are too small for an actual baby (sorry, Lori) so I changed the name. Might fit a preemie, though. Great for ornaments!

Toe-Up Sock Ornaments

Using eastern cast-on and size 2 dpns, wrap 2 double-pointed needles 6 times (6 sts on each needle). Knit top needle stitches onto another needle, then turn and knit first three stitches onto one needle and last three stitches onto a different needle. Place a marker (I use a coilless pin).

Round 1: (k1, m1, k4, m1, k1) 2 times
Round 2: knit
Round 3: (K1, m1, k6, m1, k1) 2 times
Round 4: knit
Round 5: (K1, m1, k8, m1, k1) 2 times

There are now 24 stitches. Knit 20 rounds.

Rearrange the stitches onto 4 double points, 6 stitches on each one.
For the short row heel, work as follows:

Row 1: k11, turn
Row 2: backwards yo, p10, turn
Row 3: yo, k9, turn
Row 4: backwards yo, p8, turn
Row 5: yo, k7, turn
Row 6: backwards yo, p6, turn
Row 7: yo, k5, turn
Row 8: backwards yo, p4, turn

Row 9: yo, k4, rev mount of yo, knit together with next stitch (k2tog). Turn.
Row 10: backwards yo, p5, slip yo as if to knit, slip next stitch as if to knit, purl yo and     slipped stitch together through the back loops (p2togtbl).  Turn.
Row 11: regular yo, knit 6, rev mount of yo, slip next yo as if to knit, knit together with     next stitch (k3tog). Turn.
Row 12: backwards yo, purl 7, slip yo as if to knit, slip next yo as if to knit, slip next     stitch as if to knit, purl both yo's and slipped stitch together through the back loops     (p3togtbl). Turn.
Row 13: regular yo, knit 8, k3tog as in row 11. Turn.
Row 14: backwards yo, purl 9, p3togtbl as in row 12. Turn.
Row 15: regular yo, knit 10, k3tog as in row 11. Turn.
Row 16: backwards yo, purl 11, p3togtbl as in row 12. Turn.

Next round: regular yo, knit 12.  reverse mount of yo, make 1 stitch between yo and next     stitch. Knit yo, make 1 and next stitch together (k3tog). knit 10. Slip next stitch as     if to knit. Make 1 between slipped stitch and next yo. Slip yo as if to purl.  Knit     slipped stitch, make 1 and yo together through the back loops.

Knit 4 rounds. Switch to knit 1, purl 1 rib and knit 20 rounds. Cast off as you like. I     usually use a tubular bind off.


Pattern Key:

k                            knit
p                            purl
m1                         make 1 stitch by lifting the yarn between the
                              stitch you just worked and the next stitch
                              onto the left needle and knitting it.
yo                          yarn over with leading leg in front of needle.
backwards yo         yarn over with leading leg behind needle.
rev mount               reverse mount of stitch so the leading leg is in front of needle.
slip                         move from left needle to right needle without working stitch.
k2tog                     knit 2 stitches together
p3togtbl                 purl 3 together through the back loops.

Tuesday, December 1, 2009

Teeny Tiny Socks

After the guild sale, getting ready for TACtile, Thanksgiving, and the last couple of baby showers, I think I'm rested up. The loom is warped (again) with the silk noil that I removed so I could take the woven shibori class. This time I used an advancing twill threading that Catharine gave us as one of the choices for the class. We'll see what kind of patterns I get with that!

Liam's socks

Kaite and Eric had a housewarming/baby shower last weekend in their new home. They got one of the huck towels I posted a while back and a couple of pairs of baby socks for little Liam-to-be.

Liam's other socks

I knitted a sweater for my friend Lori's baby-to-be a few months ago and gave it to her before it got lost in the mess of my pre- guild sale house. The shower was this past Sunday, so I knitted up a few pairs of socks to bring along. The dark red pair (below left) is the same yarn as the sweater. It'll be cute, if the socks and the sweater actually fit at the same time. ;) The other yarns were some leftover sock yarn that Lynne brought to knitting group and gave away. These are a smaller version of the socks I usually knit for myself on a bigger needle (because babies don't need as firm a fabric....yet).

Lori's baby's socks

Next post I'll have the pattern for you, free.


Saturday, November 21, 2009

Woven Shibori: The Last 2 Samples

I suppose if I make some more samples at home, the post will have to be called "Woven Shibori Returns." ;) Anyway, for these last 2 samples I tried a couple of things just to see what happens.
sample 7: before

Sample 7: 3/5 twill, weaving only every 3rd pick (123, 456,781, 234, etc.). Wefts are 6/2 green cotton, 7/2 green cotton, 10/2 white cotton, handspun paper yarn. Removed sections of some threads, pulled and immersion dyed in dark blue.

sample 7: after

This one was fun. I used some cottons that I had partial bobbins of to make stripes, interspersed with some handspun paper yarn I made in a class with Jennifer Falck Linnsen last spring. It felt a little stiff when I was weaving, but the finished cloth is very flexible and maintains a nice texture. It took the dye well, too. The dye penetrated the cloth more where the paper was so lines aren't as clean, but I'm not sure whether that has to so with the nature of the paper yarn or the fact that its stiffness made it harder to gather up tightly.

The thinner cotton definitely made a cleaner pattern. With the twill reclining to this degree the diagonals still show up but they are broken up into sections instead of making long lines. All in all, a nice texture and lots to think about as far as materials and pattern.

sample 8: before

Sample 8: 4/4 twill. Wefts are 10/2 cotton, ecospun polyester, and poly/cotton, with 10/2 cotton alternating with one or the other of the polyesters. Pulled, immersed in dark blue dye, steamed to set pleats.
sample 8: relaxed

I wanted to see what ratio of poly to cotton is needed to maintain pleats, even though the cotton does not heat set. The 1/2" stripe of cotton does not seem to be affected at all. The 3/4" stripe seems looser but doesn't really bubble out much. The 1" stripe of cotton dies try to flatten itself out between the poly stripes and creates a nice contrast.

sample 8: pinned open

It was also interesting to see how the 2 polys dye differently. The pure poly does not dye at all in the fiber reactive dye, but the cotton/poly takes up some of the dye (although not nearly as much as the pure cotton). Now I need to search out some polyester yarn of my very own to experiment with. This whole permanent pleat business is very exciting.

Thursday, November 19, 2009

Woven Shibori Part 3

sample 5: before

Catharine mentioned that of you use a 3/5 twill instead of a 4/4 twill, the 2 sides of the fabric will be patterned differently if you dye each side a different color. Had to try that! Also, if you would skip pick of twill, the lines would be less vertical and more horizontal. Since the gathering threads are only places every 4th pick (or more) the twill lines can be quite steep. So.............

sample 5: blue side

Sample 5: 10/2 white cotton weft with stripes of silk noil, reversing reclining twill (skipping all the picks that start with even numbers), pulled and direct dyed with thickened dyes.

sample 5: pink side

The fuschia is VERY fuschia, would have mixed a color if I had it to do over. ;) But it's a sample. I really like the effect. There are 3 stripes of silk noil in it, it's a creamier white than the cotton and took the dye differently. A little more vibrant, and more of the color from the opposite side shows though in those stripes.

sample 6: before

Sample 6: poly/cotton weft, 3/5 twill blocks, cut out some thread segments, pulled, direct dyed.

sample 6: relaxed

On this one, I left some narrow bands of cloth with no gathering threads between patterns. Since all of the weft has polyester, the pleats are permanent but those bands are more organic-looking. Not nearly as rigid and formal in its geometry as sample 4. The section where I pulled out partial threads bubbled up nicely. It should make a great effect on something, just don't know what yet.

sample 6: pinned open

Wednesday, November 18, 2009

More Woven Shibori

I guess I should say a little bit about what woven shibori is. In traditional Japanese shibori, a woven cloth has threads sewn into it with a running stitch. The threads are then gathered tightly to form a resist, a place in the cloth where the dye cannot penetrate. The cloth is then dyed and the gathering threads removed. In woven shibori, your are weaving the cloth yourself and using a supplemental weft (a different thread) to put the gathering threads in the cloth as you weave it. A very cool trick, if you ask me. The hand sewing of traditional shibori takes many hours. Woven shibori only maked the weaving take a little bit longer than it would anyway, nowhere near as time-consuming as sewing each thread, stitch by stitch, individually by hand.

taiten: before

The way you get patterns dyed into the cloth is to thread your loom to a certain pattern, like a twill, overshot, bronson lace, monk's belt, etc. You can also use plain old pickup, as in samples 1 and 2 from yesterday's post. Instead of weaving the ground cloth (what will be left after the gathering threads are removed) in that weave structure, you usually weave the ground cloth in plain weave and use the pattern shafts to place the gathering threads in the cloth.

taiten: after

Sample 3: mock Taiten. 10/2 white weft, then stripes of 8/2 unmercerized blue, lavender and green. Pulled and immersion dyed in dark blue.

Taiten is a traditional Japanese shibori method, but they put the gathering threads in the warp. In this version of taiten, all of the gathering threads are part of the plain weave ground cloth, woven into the weft. When the gathering threads are removed after dying, there are rows of holes where those threads used to be.

sample 4: before dying

Sample 4: 3/5 twill, ecospun polyester weft. disperse dye heat transfer while flat, pulled and immersion dyed in dark green, steamed to permanantly set pleats.

sample 4: relaxed

I've never woven with a ployester yarn before. This was a singles yarn, so it twisted back on itself a bit while I wove but it was totally worth it to get this result. Polyester is a thermoplastic fiber, which means that when you apply intense heat (like steam) to it, it changes shape and stays that way unless you apply intense heat again. So, the pleats are permanent and washable. The pleats follow the lines of the twill, as do the green lines of dye. The fabric was compressed to such a degree that the dye only penetrated the outer edges.

sample 4: pinned open

You can see the diamond in the middle, that's the heat transfer dye. You take thickened disperse dye, paint it on paper, let that dry, then iron it onto a fabric with polyester yarns and the dye adheres only to the polyester. The immersion dye, in contrast, only dyes the cotton yarns. Pretty great effect for not that much more work than weaving!

Tuesday, November 17, 2009

Woven Shibori Class

Catharine, Helen and Dotty

The class was a blast! I made 8 samples over the course of 3 days. The loom was warped with 10/2 white mercerized cotton at 24epi, 12" wide and threaded to an extended point twill. We used cotton embroidery floss for the pulling threads. I think I'll post a sample or 2 a day so as not to have one monster post.


fresh off the loom: samples 2 and 1

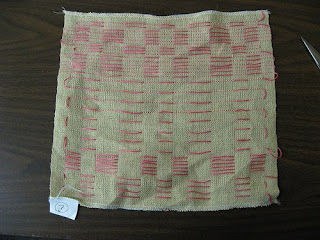
So, here is Sample 1 (on the right side of above pic): pickup on a closed shed, threads pulled tight and dyes applied directly to the cloth. The weft is 10/2 white mercerized cotton. I wanted to try a variety of spacings and patterns, so I wound up with some small, organic patterns and a few big bubbles of color (below). I painted one side with watered down blue, and the other one with less diluted fuschia. Might be a nice way to try for a landscape sometime.


sample 1

Sample 2 (left side of undyed pic): pickup on an open tabby shed, direct dyed, the pulled tight and immersion dyed. This one has the same 10/2 cotton weft. You wind up with more half-tones because some of the pulling threads are in the tabby shed.
sample 2: after the direct dying

I hand-painted yellow and fuschia dyes randomly. The immersion dye was dark green. The 2 sides look so different that I'm posting both.

sample 2: side 1


sample 2: side 2

Friday, November 13, 2009

HGB sale, Woven Shibori Workshop

The HGB sale went very well. I sold a 44" diameter knitted lace tablecloth for a very nice price, so I'm pretty jazzed. I've caught up on laundry and sleep, and got my loom warped for the Woven Shibori workshop with Catharine Ellis that I'm taking this weekend.

Catharine is great! Very open, kind and knowledgeable. I'm going to bring my camera tomorrow so I'll have some pics to show you. ;) She gave 2 talks at the guild meetings earlier this week, one on how she came to figure out woven shibori, and the other on contemporary lace. We were all inspired afterwards, and I was doubly glad I hadn't given up my spot in the workshop when I had second thoughts last month.
If you have never heard of woven shibori or want more information, check out Catharine's website

Sunday, November 1, 2009

Handweavers Guild of Boulder Annual Show and Sale

Check in for the sale is tomorrow, the opening in Tuesday night, and the sale itself runs from Wednesday through Sunday. If you like textiles or art at all, this is the place to be. 100-150 members of the guild offer their handwoven, hand knitted, handspun, pieced, dyed, painted, hand crocheted, hand beaded, and handmade paper items for sale. It's free to get in, but only you can decide whether it's free to get out. ;) More info at http://www.handweaversofboulder.org/annualsale.html.

Over the past few days, I've tagged, logged and packed up 77 items for the sale plus 3 items for the Member's Showcase, a juried show within the sale. This will be my 5th year in the sale and my 2nd in the showcase. Wish me luck!

Thursday, October 29, 2009

Dance of the Butterflies 2


I'm making progress on the new scarf after a bit of a wrong turn on chart 3. It looked great on graph paper, but knitted up the motifs looked too squished together. I think this is the first time my DH noticed that I did a serious amount of ripping. He seemed quite alarmed. ;) I fixed the chart, spreading the motifs out in both direction. Now it looks much better! It's also good to know that the Dream In Color rips well. I'm liking this yarn very much!

Chart 4 is the central bit of the pattern, 16 repeats of it makes up the bulk of the chart. I'm about halfway done with the blue scarf as of today. I wasn't sure how the pattern in the edging would look, but I'm liking it! Really frames the knitting nicely.


As for the Infinity scarf, I've knitted through chart 2 so far. I'll get back to it soon. The soysilk is a little fussier to knit. It's very slippery. I think it will look gorgeous when it's done, but right now I'm not in the mood to pay that much attention.

Sunday, October 25, 2009

Blocking Lace- Part 2


Looked all over, bought new pins, found the old ones. ;) Now I have lots. All the loops have been pinned out and I can get the other stuff out. I have done all of this dry. Now I need to wet it and starch it.


I have a plant mister that works really well for wetting it down. I mist it pretty thoroughly, then let the cotton absorb the water for a bit. You don't want it dripping wet, but the whole surface should be damp.

The little bottle has a 50/50 mixture of liquid starch and water. Spray pretty thoroughly with this one, too, but don't go overboard. A 50/50 mix is on the strong side, but the water already in the cotton dilutes it a bit. What I look for is even coverage. Make sure you spray the whole surface so you don't get limp spots. I usually go over the whole thing once in horizontal lines, then again vertically. Go around the edge once for good measure. Set the board up against something and let it dry thoroughly. When it's totally dry, unpin it and find somplace for it to live where you can enjoy it.

Thursday, October 22, 2009

Blocking Lace- Part 1

I finished knitting the snowflake doily last week and thought I would take this opportunity to take pictures as I block it. No matter how many times I knit lace and block it, I'm still amazed at the transformation a little water and tension cause.

Everybody seems to have their own favorite way to block lace. This is how I do it lately.

My blocking board is a piece of foamcore. You can get it cheaply and easily in 20x30" sheets or 32x40" sheets. This is a small one. Since this doily had 6 repeats, I used a board divided into 6, then 12 sections. If you use a sharpie the marks won't rub off. I made a mark every inch along each line (the center point is zero, 1" mark is 1" from center, etc.) so I can stretch it out evenly. I mark each 5th inch mark with the number of inches so I don't have to count too much. You can put marks for different numbers of repeats on either size, so for instance on this particular board I can block things with 6 or 12 sections on one side and 5 or 10 sections on the other. I just make them as I need them, then use them over and over.

So you get a bunch of t-pins (a big bunch, you'll need one for every cast-off loop), find the center of the doily, put a pin through it and stick the pin through the center point on the board, where all the lines come together. This keeps it centered as you stretch the doily and add pins. Also lets you know if you've gotten it a bit wonky. I've tried the flower pins, but they are a bit on the wimpy side and tend to bend. T-pins are much sturdier.

This doily has 6 main sections so I found the same point on all 6 sections and pinned them out. For this one I used the center of the edge frill right at the corners of the lacy part. Eachone is different and you can pick any spot you like, but it's easier if you choose the center of something. You want to put a pin througha bit of knitting right on the edge, or a chain stitch loop, and pull it towards you a comfortable amount. No need to pull it very tight, just get the slack out of it plus a little. Check which inch mark you are near and try to keep them all the same distance from the center. If you start out too tight (while there is only tension in one direction) it will be hard to keep the tension even as you pin out the rest of it (when there will be tension in several directions). Angle the pins a little bit away from the center so they hold tight and the knitting doesn't slip towards the t section.

Next pin out a point halfway between the first points. In this design there was another edge frill on the center of the straight edge, so I used that. This set of pins doesn't need to be pinned at the same distance from the center as the first set, but all of the pins in this set need to be at the same distance as the others in this set. For a round or square doily, anyway.

Next you pin out a spot between the first set and the second set, right in between them if you can. This doily has sticking stitch points, so that choice is easy. This set doesn't have to be the same distance out as the other sets, but they should be the same distance as each other.

Now it's time to pin out the individual loops. Start next to the points you have pinned out and work out towards the others. Once the 2 loops in either side of an original pin are placed you can remove the original pin if you like. You can pull the lace a bit farther out or release a little tension at this point to enhance the over all effect, or if you are not happy with the choice you nade earlier. You can decide, based on the design and what you see in it, to make the edges curvy or straight, or ?. This one had such a geometric feel to it that I've decided to reinforce that by pinning out the edge frill to make an angle.

At this point, I've gone through the first box of pins and need to find the other one before I can proceed any further.